Introduction
Imagine an AI that doesn’t just answer questions but actively works toward goals—researching topics, performing calculations, updating databases, and coordinating with other systems—all with minimal human supervision. This is the promise of autonomous AI agents, and building one is more accessible than you might think.
An autonomous AI agent is a system that can make decisions and take actions on its own to achieve a goal—typically by using large language models (LLMs), various tools, and memory to reason through tasks . Unlike traditional chatbots that wait for prompts, autonomous agents initiate actions, adapt to changing conditions, and learn from outcomes.
In this comprehensive guide, you’ll learn how to build an autonomous AI agent from scratch. We’ll cover everything from understanding core concepts to implementing memory systems, integrating tools, and deploying production-ready agents. Whether you’re a developer new to AI agents or an experienced engineer looking for a structured approach, this guide provides actionable, step-by-step instructions.
What You’ll Learn:
- The fundamental architecture of autonomous AI agents
- How to build a basic agent with a simple conversation loop
- Techniques for adding memory and context management
- Tool integration for real-world actions
- Advanced patterns like ReAct and multi-agent systems
- Production deployment considerations
Let’s start building.
Part 1: Understanding Autonomous AI Agents
What Makes an Agent “Autonomous”?
An AI agent is considered autonomous when it can interpret a task, decide the next step, and take action without direct human instruction . This is achieved through three core capabilities:

Figure 1: The agentic loop—perception, reasoning, action, and continuous feedback
The Three Pillars of Autonomous Agents:
- Autonomy: Navigate tasks without direct human supervision, making decisions based on available tools and contextual information
- Advanced Capabilities: Investigate, synthesize, compare, calculate, and plan—not just generate responses
- Interconnectivity: Integrate with APIs, databases, and external software to take real-world actions
Agents vs. Chatbots: The Critical Difference
| Aspect | Traditional Chatbot | Autonomous AI Agent |
|---|---|---|
| Behavior | Reactive—waits for prompts | Proactive—pursues goals |
| Actions | Generates text only | Calls tools, APIs, executes code |
| Memory | Session-based | Persistent across interactions |
| Decision-Making | Predefined rules | Dynamic reasoning |
| Adaptability | Fixed responses | Learns and improves |
Core Components of an AI Agent
A complete autonomous agent requires these building blocks:
- Perception Module: Processes input from users, APIs, or sensors
- Reasoning Engine (LLM): Makes decisions based on context and goals
- Memory System: Stores conversation history and learned information
- Tool Integration: Connects to external APIs, databases, and functions
- Orchestration Layer: Coordinates the agent loop and multi-step workflows
Part 2: Prerequisites and Environment Setup
Required Skills and Knowledge
Before diving in, ensure you have:
- Python 3.8+ proficiency (functions, classes, type hints)
- Basic understanding of APIs and JSON
- Familiarity with environment variables and command line
- (Optional) Basic machine learning concepts
Development Environment Setup
Step 1: Install Python and Package Manager
bash
# For macOS/Linux—install UV (fast Python package manager)
curl -LsSf https://astral.sh/uv/install.sh | sh

# For Windows
powershell -c "irm https://astral.sh/uv/install.ps1 | iex"
Step 2: Create Project Structure
bash
mkdir my-ai-agent && cd my-ai-agent
mkdir -p src/agent src/memory src/tools
touch src/__init__.py
touch .env requirements.txt
Step 3: Set Up Virtual Environment and Install Dependencies
bash
uv venv
source .venv/bin/activate  # On Windows: .venv\Scripts\activate

pip install openai anthropic python-dotenv requests pydantic
Step 4: Get Your API Key
bash
OPENAI_API_KEY=your-key-here
ANTHROPIC_API_KEY=your-key-here  # if using Claude
Step 5: Verify Setup
Create a test file test_setup.py:
python
import os
from dotenv import load_dotenv
from openai import OpenAI

load_dotenv()
client = OpenAI(api_key=os.getenv("OPENAI_API_KEY"))

response = client.chat.completions.create(
    model="gpt-4o-mini",
    messages=[{"role": "user", "content": "Say hello!"}]
)
print(response.choices[0].message.content)
Run with: python test_setup.py
Part 3: Building Your First Basic Agent
The Agent Loop Pattern
Every autonomous agent operates on a continuous loop: accept input → reason → decide → act → observe → repeat . Let’s implement this from scratch.
Step 1: Create the Basic Agent Class
Create src/agent/basic_agent.py:
import os
from typing import List, Dict, Any
from openai import OpenAI
from dotenv import load_dotenv
load_dotenv()
class BasicAgent:
“””A simple autonomous agent with a conversation loop.”””
def __init__(self, name: str, system_prompt: str = None):
    self.name = name
    self.client = OpenAI(api_key=os.getenv("OPENAI_API_KEY"))
    self.messages: List[Dict[str, str]] = []

    # Set system prompt
    if system_prompt:
        self.messages.append({
            "role": "system",
            "content": system_prompt
        })

def think(self, user_input: str) -> str:
    """Process input and generate a response."""
    # Add user message to history
    self.messages.append({
        "role": "user",
        "content": user_input
    })

    # Call LLM
    response = self.client.chat.completions.create(
        model="gpt-4o-mini",
        messages=self.messages
    )

    # Extract and store response
    assistant_response = response.choices[0].message.content
    self.messages.append({
        "role": "assistant",
        "content": assistant_response
    })

    return assistant_response

def reset_conversation(self):
    """Clear conversation history."""
    self.messages = [self.messages[0]] if self.messages else []
Step 2: Run Your First Agent
Create run_agent.py:
from src.agent.basic_agent import BasicAgent
#Create agent with a purpose
agent = BasicAgent(
name=”ResearchBot”,
system_prompt=”You are a research assistant. Answer questions concisely and provide sources when possible.”
)
#Interactive loop
print(f”Agent {agent.name} is ready. Type ‘quit’ to exit.\n”)
while True:
user_input = input(“\nYou: “)
if user_input.lower() == ‘quit’:
break
response = agent.think(user_input)
print(f"\n{agent.name}: {response}")
What’s happening under the hood?
- The agent stores conversation history in
self.messages - Each turn appends user input and assistant response
- The LLM uses full history for context
Part 4: Adding Memory Systems
Why Memory Matters
Without memory, agents can’t maintain context across conversations or learn from past interactions. Production agents need both short-term memory (conversation context) and long-term memory (persistent knowledge) .
Implementing Conversation Memory
Step 1 : Create Memory Manager
Create src/memory/memory_manager.py:
from typing import List, Dict, Any
import json
from datetime import datetime
class ConversationMemory:
“””Manages conversation history with token limits.”””
def __init__(self, max_tokens: int = 4000):
    self.history: List[Dict[str, Any]] = []
    self.max_tokens = max_tokens

def add_message(self, role: str, content: str):
    """Add a message to history."""
    self.history.append({
        "role": role,
        "content": content,
        "timestamp": datetime.now().isoformat()
    })
    self._trim_if_needed()

def get_context(self, last_n: int = None) -> List[Dict[str, str]]:
    """Get recent messages for LLM context."""
    if last_n:
        recent = self.history[-last_n:]
    else:
        recent = self.history

    return [{"role": m["role"], "content": m["content"]}
            for m in recent]

def _trim_if_needed(self):
    """Simple token estimation and trimming."""
    # Rough estimate: ~4 chars per token
    total_chars = sum(len(m["content"]) for m in self.history)
    estimated_tokens = total_chars / 4

    if estimated_tokens > self.max_tokens:
        # Keep system message + last 10 exchanges
        self.history = self.history[:1] + self.history[-10:]

def summarize(self) -> str:
    """Generate a summary of conversation."""
    if not self.history:
        return ""

    summary = f"Conversation from {self.history[0]['timestamp']}\n"
    for m in self.history:
        summary += f"{m['role']}: {m['content'][:100]}...\n"
    return summary

Step 2: Enhanced Agent with Memory
Update src/agent/memory_agent.py:
python
from src.agent.basic_agent import BasicAgent
from src.memory.memory_manager import ConversationMemory

class MemoryAgent(BasicAgent):
    """Agent with persistent memory capabilities."""

    def __init__(self, name: str, system_prompt: str = None):
        super().__init__(name, system_prompt)
        self.memory = ConversationMemory()

        # Initialize memory with system prompt
        if system_prompt:
            self.memory.add_message("system", system_prompt)

    def think(self, user_input: str) -> str:
        """Process input with memory context."""
        # Add user input to memory
        self.memory.add_message("user", user_input)

        # Get context from memory
        context = self.memory.get_context(last_n=20)

        # Call LLM with context
        response = self.client.chat.completions.create(
            model="gpt-4o-mini",
            messages=context
        )

        assistant_response = response.choices[0].message.content

        # Add to memory
        self.memory.add_message("assistant", assistant_response)

        return assistant_response

    def get_conversation_summary(self) -> str:
        """Return summary of all interactions."""
        return self.memory.summarize()
Long-Term Memory with Vector Databases
For advanced memory, use vector databases like ChromaDB to store and retrieve semantically similar past interactions .

python
# Install chromadb first: pip install chromadb

import chromadb
from chromadb.utils import embedding_functions

class VectorMemory:
    """Long-term memory using vector embeddings."""

    def __init__(self, collection_name: str = "agent_memory"):
        self.client = chromadb.Client()
        self.collection = self.client.create_collection(
            name=collection_name,
            embedding_function=embedding_functions.DefaultEmbeddingFunction()
        )

    def add_memory(self, text: str, metadata: Dict = None):
        """Store a memory with embedding."""
        self.collection.add(
            documents=[text],
            metadatas=[metadata or {}],
            ids=[str(hash(text))]
        )

    def search_memory(self, query: str, n_results: int = 3) -> List[str]:
        """Retrieve relevant memories."""
        results = self.collection.query(
            query_texts=[query],
            n_results=n_results
        )
        return results['documents'][0] if results['documents'] else []
Part 5: Tool Integration and Function Calling
Giving Agents the Ability to Act
Tools are what transform a language model into an autonomous agent. A tool can be any Python function, API call, database query, or external service that the agent can invoke to accomplish tasks .
Creating a Tool System
Step 1: Define Tool Schema
Create src/tools/base_tool.py:
python
from typing import Any, Callable, Dict, Optional
from pydantic import BaseModel

class ToolParameter(BaseModel):
    """Parameter definition for a tool."""
    name: str
    type: str
    description: str
    required: bool = True

class Tool(BaseModel):
    """Base class for agent tools."""
    name: str
    description: str
    parameters: list[ToolParameter]
    function: Callable

    def execute(self, **kwargs) -> Any:
        """Execute the tool with given parameters."""
        try:
            return self.function(**kwargs)
        except Exception as e:
            return f"Error executing tool: {str(e)}"
Step 2: Implement Example Tools
Create src/tools/calculator.py:
python
from .base_tool import Tool, ToolParameter

def calculate_average(numbers: list) -> float:
    """Calculate the average of a list of numbers."""
    if not numbers:
        return 0
    return sum(numbers) / len(numbers)

def web_search(query: str) -> str:
    """Simulate web search (replace with actual API)."""
    # In production, use SerpAPI, Tavily, or Brave Search
    return f"Search results for: {query}"

def get_current_time() -> str:
    """Get current date and time."""
    from datetime import datetime
    return datetime.now().strftime("%Y-%m-%d %H:%M:%S")

# Define tools with schemas
tools = [
    Tool(
        name="calculate_average",
        description="Calculate the average of a list of numbers",
        parameters=[
            ToolParameter(name="numbers", type="list",
                         description="List of numbers to average")
        ],
        function=calculate_average
    ),
    Tool(
        name="web_search",
        description="Search the web for information",
        parameters=[
            ToolParameter(name="query", type="string",
                         description="Search query")
        ],
        function=web_search
    ),
    Tool(
        name="get_current_time",
        description="Get the current date and time",
        parameters=[],
        function=get_current_time
    )
]
Step 3: Agent with Tool Calling
Create src/agent/tool_agent.py:
python
import json
from typing import List, Dict, Any
from src.agent.basic_agent import BasicAgent
from src.tools.calculator import tools

class ToolAgent(BasicAgent):
    """Agent that can use tools to accomplish tasks."""

    def __init__(self, name: str, system_prompt: str = None):
        super().__init__(name, system_prompt)
        self.tools = {tool.name: tool for tool in tools}
        self.tool_schemas = self._prepare_tool_schemas()

    def _prepare_tool_schemas(self) -> List[Dict]:
        """Convert tools to OpenAI function calling format."""
        schemas = []
        for tool in self.tools.values():
            properties = {}
            required = []

            for param in tool.parameters:
                properties[param.name] = {
                    "type": param.type,
                    "description": param.description
                }
                if param.required:
                    required.append(param.name)

            schemas.append({
                "type": "function",
                "function": {
                    "name": tool.name,
                    "description": tool.description,
                    "parameters": {
                        "type": "object",
                        "properties": properties,
                        "required": required
                    }
                }
            })
        return schemas

    def think(self, user_input: str) -> str:
        """Process input with tool calling capability."""
        self.messages.append({"role": "user", "content": user_input})

        # First call to determine if tools are needed
        response = self.client.chat.completions.create(
            model="gpt-4o-mini",
            messages=self.messages,
            tools=self.tool_schemas,
            tool_choice="auto"
        )

        message = response.choices[0].message

        # Check if the model wants to call a tool
        if message.tool_calls:
            # Execute tools
            for tool_call in message.tool_calls:
                tool_name = tool_call.function.name
                arguments = json.loads(tool_call.function.arguments)

                # Execute tool
                tool = self.tools.get(tool_name)
                if tool:
                    result = tool.execute(**arguments)

                    # Add tool result to conversation
                    self.messages.append({
                        "role": "tool",
                        "tool_call_id": tool_call.id,
                        "content": str(result)
                    })

            # Second call to generate final response
            final_response = self.client.chat.completions.create(
                model="gpt-4o-mini",
                messages=self.messages
            )
            assistant_response = final_response.choices[0].message.content
        else:
            assistant_response = message.content

        self.messages.append({"role": "assistant", "content": assistant_response})
        return assistant_response
Using MCP Servers for Standardized Tool Access
The Model Context Protocol (MCP) provides a standardized way for agents to discover and use tools. Here’s a basic MCP server implementation :
python
# mcp_server.py
from mcp import Server, Tool

server = Server("my-agent-server")

@server.tool()
def get_weather(city: str) -> str:
    """Get current weather for a city."""
    return f"Weather in {city}: 72°F, sunny"

# Run with: python mcp_server.py
Part 6: Advanced Agent Architectures
The ReAct Pattern (Reason + Act)
The ReAct pattern interleaves reasoning traces with task-specific actions, allowing agents to think step-by-step before acting .
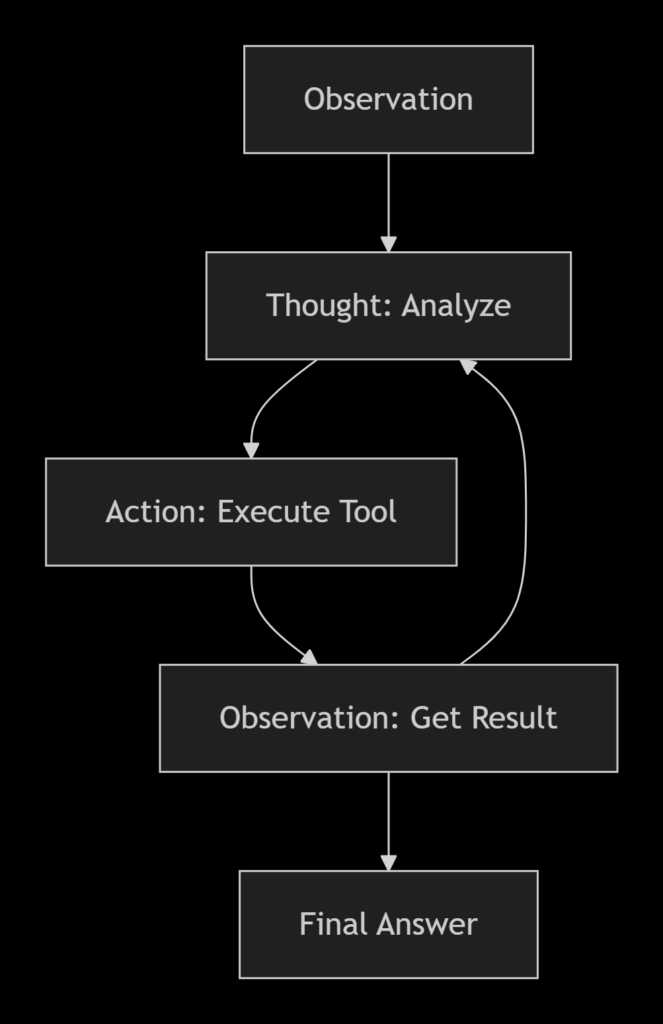
Figure 2: The ReAct cycle—Thought, Action, Observation
Implementing ReAct Pattern
Create src/agent/react_agent.py:
python
class ReActAgent(ToolAgent):
    """Agent using ReAct (Reason + Act) pattern."""

    REACT_PROMPT = """You are an autonomous agent. Follow this format:

Question: {input}
Thought: You should think about what to do next
Action: The action to take (one of: {tools})
Action Input: The input to the action
Observation: The result of the action
... (repeat Thought/Action/Observation as needed)
Thought: I now know the final answer
Final Answer: The final answer to the original question

Available tools: {tool_list}
"""

    def think(self, user_input: str) -> str:
        """Process using ReAct pattern."""
        tool_names = ", ".join(self.tools.keys())

        # Build prompt with available tools
        prompt = self.REACT_PROMPT.format(
            input=user_input,
            tools=tool_names,
            tool_list=tool_names
        )

        # Iterative reasoning loop
        max_iterations = 5
        current_prompt = prompt

        for i in range(max_iterations):
            response = self.client.chat.completions.create(
                model="gpt-4o-mini",
                messages=[{"role": "user", "content": current_prompt}]
            )

            content = response.choices[0].message.content

            # Check for final answer
            if "Final Answer:" in content:
                return content.split("Final Answer:")[-1].strip()

            # Parse and execute action
            if "Action:" in content and "Action Input:" in content:
                action_line = [l for l in content.split("\n") if "Action:" in l][0]
                input_line = [l for l in content.split("\n") if "Action Input:" in l][0]

                action = action_line.replace("Action:", "").strip()
                action_input = input_line.replace("Action Input:", "").strip()

                # Execute tool
                tool = self.tools.get(action)
                if tool:
                    result = tool.execute(**{"query": action_input} if "query" in str(tool.parameters) else {})

                    # Add observation to prompt
                    current_prompt = content + f"\nObservation: {result}\n"

        return "Unable to complete task within iterations"
Multi-Agent Systems
For complex tasks, specialized agents can collaborate. AG2 (formerly AutoGen) provides excellent patterns for multi-agent orchestration .
Basic Multi-Agent Setup with AG2
python
from autogen import ConversableAgent, GroupChat, GroupChatManager, LLMConfig
import os

# Configure LLM
llm_config = LLMConfig(
    api_type="openai",
    model="gpt-4o-mini",
    api_key=os.environ["OPENAI_API_KEY"]
)

# Create specialized agents
researcher = ConversableAgent(
    name="Researcher",
    system_message="You research topics and find information.",
    llm_config=llm_config
)

writer = ConversableAgent(
    name="Writer",
    system_message="You synthesize information into clear content.",
    llm_config=llm_config
)

reviewer = ConversableAgent(
    name="Reviewer",
    system_message="You review content for accuracy and clarity.",
    llm_config=llm_config
)

# Create group chat
groupchat = GroupChat(
    agents=[researcher, writer, reviewer],
    messages=[],
    speaker_selection_method="auto"
)

manager = GroupChatManager(
    groupchat=groupchat,
    llm_config=llm_config
)

# Start collaboration
researcher.initiate_chat(
    manager,
    message="Research and write a summary of recent AI agent developments."
)
Orchestration Patterns
Five fundamental orchestration patterns for AI agents :
| Pattern | Description | Use Case |
|---|---|---|
| Chaining | Sequential execution | Document processing pipelines |
| Routing | Conditional branching | Customer support triage |
| Parallelization | Concurrent execution | Data processing, web scraping |
| Orchestrator-Workers | Central controller with workers | Complex task decomposition |
| Evaluator-Optimizer | Iterative refinement | Content generation, code review |
Part 7: Deploying Your Agent with FastAPI
Creating a Production API
Use FastAPI to expose your agent as a service :
Create main.py:
python
from fastapi import FastAPI, HTTPException
from pydantic import BaseModel
from src.agent.tool_agent import ToolAgent
import uvicorn

app = FastAPI(title="AI Agent API", version="1.0.0")

# Initialize agent once
agent = ToolAgent(
    name="ProductionAgent",
    system_prompt="You are a helpful assistant that can use tools to help users."
)

class QueryRequest(BaseModel):
    question: str
    session_id: str = None

class QueryResponse(BaseModel):
    response: str
    session_id: str

@app.post("/ask", response_model=QueryResponse)
async def ask_agent(request: QueryRequest):
    """Send a question to the AI agent."""
    try:
        response = agent.think(request.question)
        return QueryResponse(
            response=response,
            session_id=request.session_id or "default"
        )
    except Exception as e:
        raise HTTPException(status_code=500, detail=str(e))

@app.get("/health")
async def health_check():
    """Health check endpoint."""
    return {"status": "healthy"}

@app.get("/tools")
async def list_tools():
    """List available tools."""
    return {"tools": list(agent.tools.keys())}

if __name__ == "__main__":
    uvicorn.run(app, host="0.0.0.0", port=8000)
Running Your Agent Service
bash
# Install FastAPI and Uvicorn
pip install fastapi uvicorn

# Run the server
uvicorn main:app --reload --host 0.0.0.0 --port 8000
Your agent API is now available at http://localhost:8000/docs with automatic OpenAPI documentation.
Adding Guardrails
Prevent misuse and ensure safety with input validation :
python
from fastapi import FastAPI, HTTPException, Depends
import re

class Guardrails:
    """Input validation and safety checks."""

    FORBIDDEN_PATTERNS = [
        r"(?i)hack|exploit|bypass|illegal",
        r"(?i)ignore previous instructions",
    ]

    @classmethod
    def validate_input(cls, text: str) -> bool:
        """Check if input passes safety checks."""
        for pattern in cls.FORBIDDEN_PATTERNS:
            if re.search(pattern, text):
                return False
        return True

@app.post("/ask")
async def ask_agent(request: QueryRequest):
    # Check input safety
    if not Guardrails.validate_input(request.question):
        raise HTTPException(status_code=400, detail="Input blocked by safety policy")

    response = agent.think(request.question)
    return {"response": response}
Part 8: Testing and Evaluation
Testing Your Agent
Create tests/test_agent.py:
python
import pytest
from src.agent.basic_agent import BasicAgent
from src.agent.tool_agent import ToolAgent

@pytest.fixture
def basic_agent():
    return BasicAgent("TestBot")

def test_basic_response(basic_agent):
    response = basic_agent.think("Say hello")
    assert response is not None
    assert len(response) > 0

def test_tool_calculation():
    agent = ToolAgent("CalcBot")
    response = agent.think("What is the average of 10, 20, and 30?")
    assert "20" in response or "average" in response.lower()

def test_memory_persistence():
    agent = BasicAgent("MemoryBot")
    agent.think("My name is Alice")
    response = agent.think("What is my name?")
    assert "Alice" in response
Evaluation Metrics
| Metric | Description | Target |
|---|---|---|
| Task Success Rate | % of tasks completed successfully | >80% |
| Tool Call Accuracy | % of tool calls that were appropriate | >90% |
| Response Latency | Time from input to output | <3 seconds |
| Hallucination Rate | % of responses with false information | <5% |
Part 9: Best Practices and Common Pitfalls
Architecture Best Practices
- Modular Design: Separate perception, reasoning, and execution layers
- Observability: Log every decision, tool call, and outcome
- Human-in-the-Loop: Add approval steps for critical actions
- Error Handling: Gracefully handle tool failures and API errors
- Rate Limiting: Respect API limits with queuing and backoff
Common Pitfalls to Avoid
Cost Optimization
python
class CostTracker:
    """Track and optimize API costs."""

    def __init__(self):
        self.total_tokens = 0
        self.total_cost = 0

    def add_usage(self, prompt_tokens: int, completion_tokens: int):
        self.total_tokens += prompt_tokens + completion_tokens
        # GPT-4o-mini pricing: $0.15/1M input, $0.60/1M output
        cost = (prompt_tokens * 0.15 / 1_000_000) + (completion_tokens * 0.60 / 1_000_000)
        self.total_cost += cost

    def report(self):
        return {
            "total_tokens": self.total_tokens,
            "total_cost_usd": round(self.total_cost, 4)
        }
Part 10: MHTECHIN’s Expertise in AI Agent Development
At MHTECHIN, we specialize in building cutting-edge AI solutions that empower businesses to harness the full potential of autonomous agents . Our expertise spans:
- Conversational AI: Building intelligent chatbots and virtual assistants with natural language understanding
- Multi-Agent Systems: Developing teams of specialized agents that collaborate on complex tasks
- Reinforcement Learning: Creating agents that learn and optimize through experience
- Enterprise Integration: Deploying secure, scalable AI agents that integrate with existing systems
MHTECHIN’s AI solutions leverage state-of-the-art technologies including transformer models, reinforcement learning algorithms, and custom multi-agent frameworks to deliver production-ready autonomous systems .
Conclusion
Building an autonomous AI agent from scratch is an achievable goal with the right approach. You’ve learned how to:
- Understand the fundamentals: What makes an agent autonomous and the core components required
- Set up your environment: Python, API keys, and project structure
- Build a basic agent: The agent loop with conversation management
- Add memory systems: Short-term context and long-term vector storage
- Integrate tools: Function calling and MCP servers for real-world actions
- Implement advanced patterns: ReAct reasoning and multi-agent collaboration
- Deploy with FastAPI: Production-ready APIs with safety guardrails
- Test and optimize: Evaluation frameworks and cost management
The journey from a simple chatbot to a fully autonomous agent is one of progressive enhancement. Start with the basic loop, add memory, integrate tools, and gradually increase autonomy with human oversight.
Next Steps:
- Explore the open-source resources at AI-Agents-from-scratch GitHub for hands-on tutorials
- Check out AG2’s documentation for advanced multi-agent patterns
- Experiment with different tool integrations and reasoning strategies
Frequently Asked Questions (FAQ)
Q1: What is an autonomous AI agent?
An autonomous AI agent is a system that can interpret tasks, make decisions, and take actions without direct human instruction. It uses LLMs for reasoning, tools for actions, and memory for context .
Q2: Do I need a paid API key to build agents?
Free tier APIs from OpenAI or Anthropic are sufficient for learning and building basic agents. Production deployments will require paid access .
Q3: What’s the difference between LangChain and building from scratch?
Building from scratch teaches you fundamentals—you’ll understand what frameworks like LangChain do under the hood. Frameworks accelerate development but abstract away implementation details .
Q4: How do I prevent agents from making harmful decisions?
Implement guardrails for input validation, use human-in-the-loop for critical actions, set clear autonomy boundaries, and maintain audit trails of all decisions .
Q5: Can I use open-source LLMs instead of OpenAI?
Yes. AG2 supports multiple providers including Anthropic, local models via Ollama, and open-source models through Hugging Face .
Q6: How much does it cost to run an AI agent?
Costs vary based on usage. With GPT-4o-mini, simple conversations cost fractions of a cent. Heavy tool usage increases costs. Implement caching and model routing to optimize .
Q7: How do I test my agent’s performance?
Use structured tests for tool calling accuracy, task completion rates, and response quality. Evaluate with metrics like success rate, latency, and hallucination detection .
Q8: What’s the best framework for multi-agent systems?
AG2 (formerly AutoGen) is excellent for multi-agent workflows with built-in patterns for group chat, swarms, and nested conversations .
Leave a Reply